Cremona Revival Table of Contents Page //
Historical Making and Preliminary Topics
1) --- Measurements & Proportions
2) --- Instrument Shapes: Origins and Evolving Geometry
3) --- Arts & Materia
4) --- Making Traditions
--- Instrument Shapes: Origins and Evolving Geometry
There are many ways to create shapes.
The various methods for drawing or creating shapes have
different strengths and natures. Some
methods are very loose, relying greatly on the artist’s eye. Some are variously assisted mechanically, or
rely on various sorts of rules or guides.
At one extreme, we have unassisted freehand drawing. At an opposite extreme, we have direct mechanical
copying from a model or template.
What we see in classical Cremona instrument making leans heavily on the shapes we can making by combining straight lines and simple circle arcs – the shapes drawn from a straight edge and dividers.
Here, we’ll look at various means for creating and using shapes in instrument making.

For modern instrument makers, a very familiar approach is to directly copy shapes from famous example instruments, or from predetermined templates. Contemporary luthiers talk about making their ‘Messiah’, their version or copy of one of the most famous Stradivari violins. Such copying of old master examples has held a large place in making since around the time of Vuillaume in the 1800s. Creating instrument shapes for the copyist is a matter of more or less direct imitation of a specific instrument, or at least of an old maker's particular style.
But, how were such instrument shapes originated?
*****************
We have not a single example of one of the old masters
making a ‘copy’ instrument in the modern sense. The copy approach is a modern approach, divergent from the older methods.
We don't see the old masters copy, nor do we see them even exactly repeat themselves. They did not make a master template shape and simply repeat that exactly. No. Something else is going on.
We see a very wide range of instrument shapes, always varied, always individual creations. At the same time, something shared runs through all the classical work, unifying even the most diverse examples.
Admittedly, some makers made many very similar instruments, like Nicolo Amati for example. But, even comparing treble side to bass side, or front to back in a single instrument, we won't find simple equality of shape, we won't find identical symmetry. And, instrument to instrument we will also find small variations of design detail. In these classical traditions, each instrument ends up unique and distinct.
So, if the old masters weren't just tracing out templates, or copying prior examples, how did they make their instrument shapes? What both unifies the old classical making, and gives it such freedom?
We will suggest it is a tradition of shapes from simple recipes of compass and ruler design. Certain patterns of geometry were used for generation upon generation of instrument designs. We might call these most used patterns ‘design recipes’.
In later posts, we will also explore how these recipes were interactive and bound up with the making process. It would be possible to use the old geometry recipes in a modern way, to fully resolve a design ahead of time in full detail. But, we will find that such an approach contradicts the evidence, and the nature of old Cremona making. Instead, we will find a back and forth between design choices and the unfolding building process of an instrument. These old methods yield beautiful results, but by responding and adjusting design during the building process. These methods don't yield perfect equal symmetry from treble to bass, from back to front, or from instrument to instrument. Instead, they naturally embed a certain level of variance and asymmetry, just as we see in all the old example instruments.
****************
We can uncover these old ‘recipes’ by carefully observing shared patterns of geometry usage across many historical examples instruments.
When we dig deeply into such observations of geometry in historical instrument making, we find extensive reuse of common geometry patterns across European instrument making in general. In the case of old Cremona violin family work, we find such traditions of geometry extend into basically every feature.
Such recipes present traditional options and structure, but the maker chooses how to actually realize these ‘recipes’ in the course of building a particular instrument.

The variable element, the choice, might be ‘which one part’ the radius separates the circle centers. The tradition is highly structured, but leaves the maker choosing to use a 1 to 3 proportion, versus 1 to 2 or 1 to 4, etc. And, this choice gives differing results. Such ‘traditional recipes’ generally have the maker choosing among traditional ranges of options.
These ‘traditional recipes’ structure the options and the playing field. But the maker steers and decides how the design will development as an instrument is built.
When taking a broad view across many examples of European instrument making, what we mostly see are slowly evolving traditions based in repeated patterns of geometry based in lines and arcs. These are the ‘design recipes’. We will also note that the usage of such recipes evolves over generations of making. Particular patterns become traditional for specific uses. But over generations of examples, we will also see variations and complexities of usage extend and develop. We might recognize this as a ‘cultural evolution’ of the design recipes.
*******************
Consider sound holes for example.
Iconography shows circles and rectangular cut outs as the simple starting points for sound hole shapes. The circular sound hole is still with us in various instrument types today, both in ‘open’ and ‘grilled’ versions.
We even have description of a Spanish guild examine requiring the applicant to produce a multilayered ‘rosette’ from scratch, aided only by his dividers.
Here is a 1700c Stradivari guitar example:

Looking across a broad range of archaic historical instruments, we see a scatter shot of sound hole arrangements, exploring many different possibilities. In many examples, we see the impetus to co-ordinate the position of sound holes with the stringing arrangement and the bridge. But we also see sound holes distributed around the bodies of instruments, almost as vents.

From even the earliest evidence in paintings, we also see examples with pairs of sound holes on either side of the center line of the instrument, instead of cutting through this center line. Such pairs of sound holes also tend to create an ‘island’ area where you could quite naturally place a bridge. But in many early examples, the actual bridge placement wanders considerably.

Above, we see a depiction of one of the earliest known famous fiddlers.
The image is entirely consistent with many similar early depictions. We see a pair of sort of ‘lune’ shaped sound holes. The vielle itself has a pear shape outline and a ‘spade’ type peghead. We are likely seeing a flat top to the instrument and a long attached bridge, much like a guitar. Some of these now archaic features continued in other types of instruments at least into the 17th century.
**********************

Now, in this 1365 mural from Florence we see a combination of old archaic features, and newer elements that bring us closer toward violin family features. This is an older style ‘Lira da Braccio’, or ‘lire of the arm’.
We again see a flat arrangement of strings, the lune shaped sound holes, the spade style peghead. But now, we have a fingerboard elevated over the top. We have a ‘tailpiece’ arrangement. The instrument has a waist and a ‘peanut’ rather than pear body shape. And, the painting at least hints that the top may have been slightly crowned or arched in shape. We also have a bridge that appears to simply be placed under the strings and held in place by tension.
If we consider the sound holes and bridge placement, we again see the sound holes and bridge placed in conjunction, but now the sound holes are below the line of the bridge. And, instead of being arranged at the bottom of the instrument, the whole configuration has been situated just below the instrument’s waist, the narrowest spot across the top.
This begins to show why we talk of ‘evolving tradition’.
There is a great tendency in the historical instruments to reuse, to reshuffle, to modify the same geometric structures over and over again.
At a glance, many of the archaic instruments can appear bizarre or exotic to our modern eyes. But, as we explore more, long lines of development emerge.
Many the apparent ‘innovations’ in historical instruments turns out to be reshufflings of themes from one family of instruments into another, or the return of some older idea, etc. The view that emerges is of an instrument making culture that greatly favors repetition of established ideas and methods, along with a slow evolution of preferences and choices in the detailed usage of those materials.
*******************
You could just freehand those kidney shaped ‘lune’ sound holes. But, we can also understand the idea of these shapes in terms of circles and arcs.


The basic idea is to again use circles at either end of the design, joined smoothly on the outside edge, but on the inside we just move things around slightly. For a pair of sound holes, this creates a more pronounced ‘island’ area between them.
This
evolved shape also starts to bring out the smaller circles of each end
of the sound holes. This feature grows in prominence and significance
as sound holes evolve.
We see many historical examples of this basic structure. We also see more elaborated versions.


Among such archaic examples, we also see some that are more directly ‘C’ shaped. And, as seen in some of the illustrations above, we see others examples that are essentially made from circles an either end, connected by more or less complicated or squiggly line like shapes between.
**********************
To observe the earlier examples, we necessarily rely mostly on paintings and other art work. But, beginning from the 1500s, we have an increasing number of surviving actual instrument examples to observe.
Made possibly before 1550, we have this fine instrument by Giovanni Maria, originally from Brescia, but later working in Venice.

Notice, the C shape sound holes of this instrument bring together many things we saw in earlier iconographic examples. Moreover, the geometry of these C shapes is a variation on the simple ‘lune’ shape geometry we saw in very archaic examples. Variations of this sort of C shape are seen in many instruments.
And, not only is this shape an evolution from the simplest early beginnings, we shall see that the later F shape sound holes are merely an evolution from this C type shape.

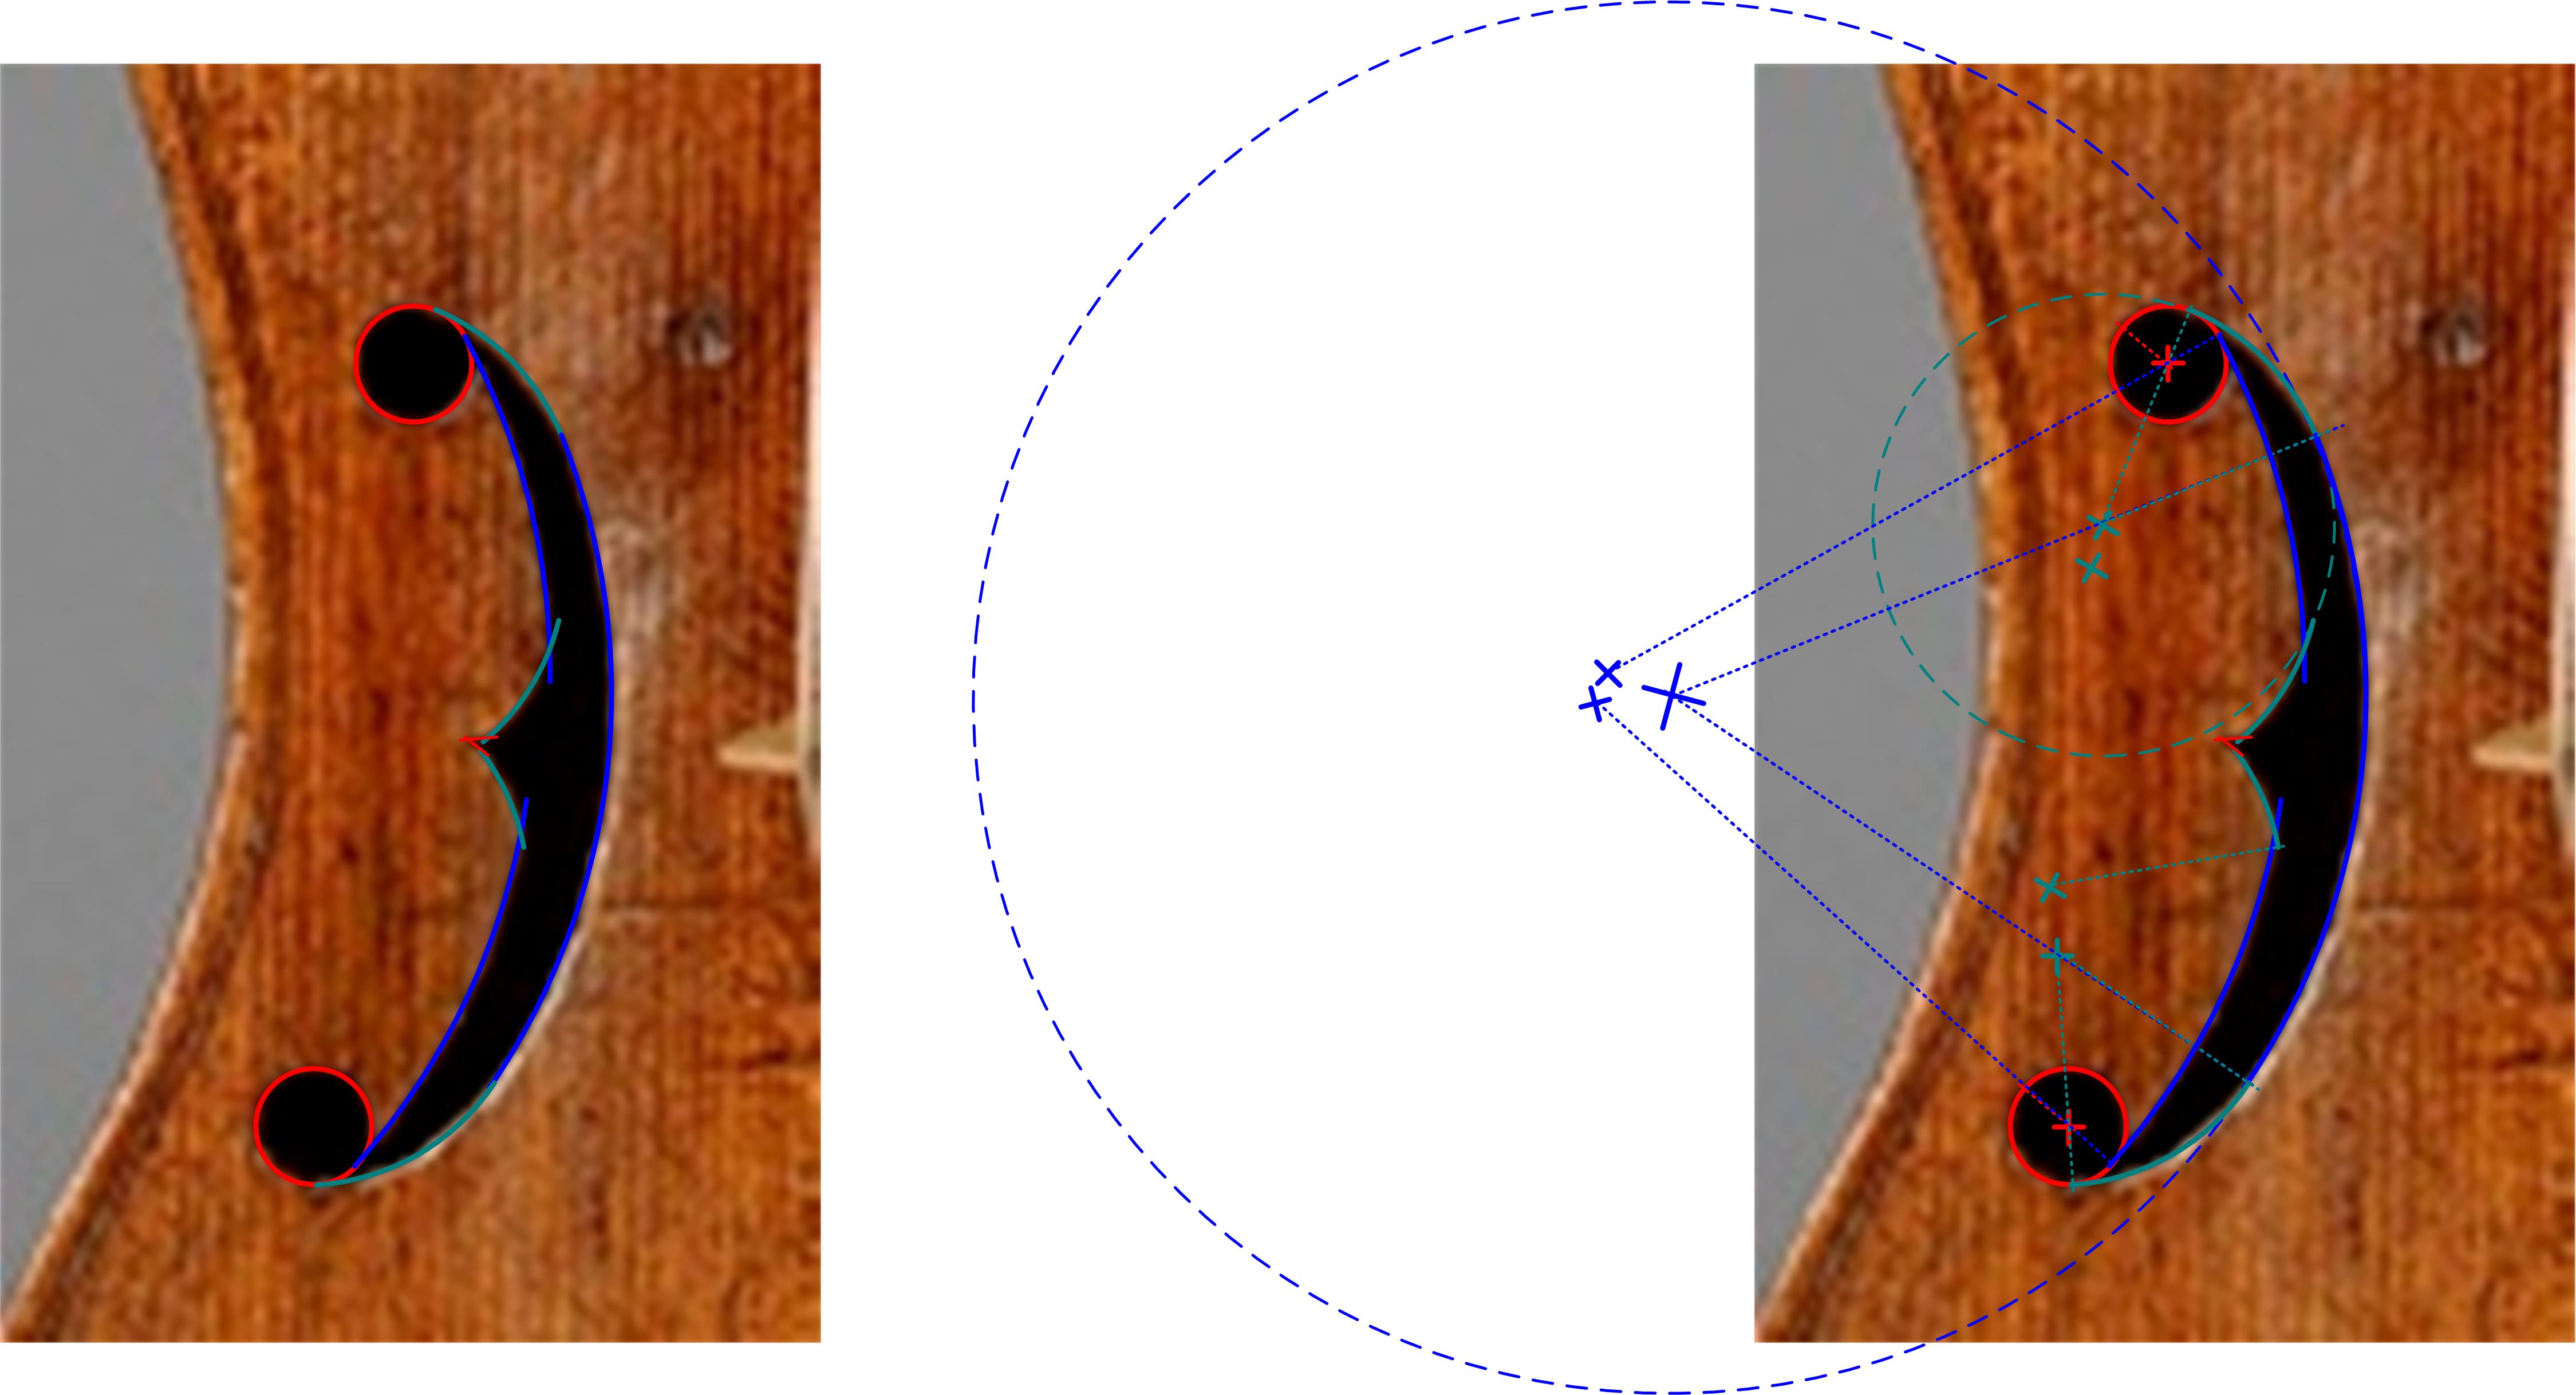
With some care, we can analyze the various components building the sound hole shape.

The ‘eyes’ or circles, shown as 1), are equal in size to each other. In item 2), the arcs coming off the eyes have radius exactly x2 the diameter of the eyes. In turn, the long arc joining these elements has a radius exactly 3x times these. So, the radius for the long arc is 6x the diameter of the eyes. In item 4), we see further arcs added coming from the eyes to form the stem of these sound holes. These new arcs have the same radius as the long joining arc. They are 6x the eye diameter. In item 5), the sound hole is finished by adding a ‘notch’ formation to the stem of the sound hole. The main arcs forming this notch have radius 2x the eye diameter. Thus they match the first arcs that come off the eyes. As a last detail, the end of the notch is given a further little sharp peak with some small additional cuts.

This flipped around C type of F
sound hole is the geometry structure of
the F hole designs seen in early Brescian masters like Zanetto. Just a
little later, we the very same geometry in Andrea Amati's earliest work.
Further, this F as a flipped version of the archaic C sound hole is the
starting point design for all the sound holes that developed in the
course classical Cremona making.
*********************
In a similar ways, we can see a few ‘evolving threads’ of development running through the historical body shapes used.
Sticking just to stringed instruments with necks, let’s see if we can’t find some orientation amidst the ‘zoo’ of historically instrument shapes.
1) Perhaps most basic, we have various rectangular or boxy shaped instruments:

2) We have various more or less ovoid and pear shapes:

3) Over time, we increasingly see designs with some sort of waist introduced:

4) And, we see a sort of side line of more elaborately shaped ‘leaf’ or festooned body shapes:

**************************
Now, let’s consider some common elements running through this wildly diverse range of archaic and historical necked stringed instruments.
The rectangular shapes are in a sense the simplest. Such rectangular shapes perhaps played a bigger role in Medieval times and into the Renaissance, but such designs still appear occasionally.
%20Just%20the%20violleta.jpg)
The principle characteristic of this sort of design is that you can very obviously ‘frame’ the body design in a rectangle. Further, such a rectangular frame intrinsically has some proportional aspects, like a length to width ratio, and a mid length line.

We don’t often see actual unrelieved rectangle instrument bodies. Usually the design is relieved with some arc shapes or other graces at the corners. We see this 'relieved rectangle' in both the Medieval French cythara and the Renaissance Italian ‘violette’ shown earlier.
Such rectangular body designs are perhaps the simplest possible. Yet, even when not the overt instrument shape, we can consider a ‘rectangular frame’ around any instrument, helping reveal aspects of its design.
Here, we look at the idea of a rectangular frame imposed around an ovoid body shape:

In this case, these upper and lower ‘framing squares’ overlap, revealing a natural midsection to the design.
When an instrument's body length is than double its width, then the upper and lower ‘framing squares’ won’t overlap. Instead, they will create a gap. But again, these squares reveal a naturally defined midsection to the overall design.
 Designs based very directly on rectangles and box shapes occur here
and there in the historical examples. Many more instruments are not though. However, imposing such rectangular frames around any instrument design can be very
revealing.
Designs based very directly on rectangles and box shapes occur here
and there in the historical examples. Many more instruments are not though. However, imposing such rectangular frames around any instrument design can be very
revealing.
Consider this illustration. The sound holes are sized in relation to circles with a diameter 1/3 the width of the instrument. The upper sound hole pattern is centered in the upper framing square. The lower sound hole circle sits on a line ½ up the lower framing square. The bridge line sits 1/3 up this lower framing square. The narrowest point of the body, the waist, sits at the bottom end of the upper framing square. And on it goes.

These patterns are not the exceptions, but the most general and readily observable trends running through the evolving historical instrument designs.
************************
Consider now the development of those beautifully curved
instrument shapes that look nothing like ‘rectangular design frames’.
To open up these ideas, let’s first explore a uniquely clear and simple early example, the 1450c lute ‘exemplar’ from Henri Arnaut of Zwolle (in the Netherlands).
This is a rare case where we have an instrument example design that overtly displaying its geometry for us.

Much of Arnaut’s drawing concerns the making of the shell back for this lute. But, we will focus on the body outline shape and the sound hole.


Thanks to Euclid’s geometry rules for smoothly joining circle arcs, the choices for this last bit of curve are already quite limited and structured. Euclid tells us that for two arcs to join smoothly, the second arc must continue from the old at a point that falls in the same line with the centers of both arcs. I’ve shown the joining lines here as dashed green lines.
In this circumstance, we could close off the end curve by choose a joining circle arc with larger or smaller radius. No matter the size we choose, the symmetry of the design will mean our joining arc needs to have its center point fall along the center line of the instrument. A smaller radius arc will join higher up this center line, yielding a longer body length. A larger choice will join lower down and give a shorter body length. So, the instrument designer still has some discretion at this stage. If the designer had wanted a particular body length, or a particular ratio to the width, that could be easily achieved by choosing this join arc’s center on purpose to create that result. But we don’t see that in this design.
In this case, the designer chose to set the arc center at the top of the main lower curve’s circle.

We can also see Arnaut’s choices for the sound hole. He shows us markings dividing the main circle’s radius into 5 parts. He’s placed the sound hole with a diameter of 3 of these fifths, centered along the radius.
***************
So, we’ve made some progress toward understanding the origination of historical instrument shapes. And, in studying sound hole shapes, we saw how initial shape geometries get repeated, but also get morphed to evolve into a wider range of shapes, developed from the simplest stating points.
Let’s now consider the basic structure of the Arnaut design. The main structure of Arnaut's design turns out to be very fundamental to most of the historical shapes that evolved in the traditions. The usage of these basic elements can morph to yield a much broader range of historical instrument shapes.
At its most basic, the Arnaut design springs from a waist line with the instrument width marked in.
He worked the bottom shape of the instrument as a simple half circle arc from this line.

To get an elongated pear type shape, he used some longer radius arcs rising from this same line. In this case, he used the line itself as the radius for these rising arcs.

His pear design structure was then completed and closed with a joining arc at the top. However, the closing off of this shape is less interesting for our purposes than the pattern of line, bottom curve, and rising arcs is.
From this simple initial geometry structure, many variations are possible.

Perhaps we want the bottom shape to be broader and squatter, not a simple circle arc. For this result, we can build the shape as arcs from an overlapping circle pattern, with a long radius arc joining across the bottom.
The original structure is made of only 4 arcs. The squatter bottomed variation takes 6 arcs instead.

In a different kind of variation, we can use a 4 arc structure again, but this time to make an ovoid shape, with wide waist more midway.
We also see a variety of ‘peanut’ shaped designs. These have both upper and lower wide areas, and a curved waist coming in at the middle area.
We can create such a shape from these same materials by using incomplete pear shapes.

We take two of these, and turn one upside down to create the top area curve. Then we use large radius circle arcs to join these and form a waist.
What we’re seeing is the varied reuse of conserved materials.
This seems to be one of the deeper characteristics of the old instrument making traditions. And, this sort of varied reuse of design materials naturally leads to the evolving development of instrument designs we see historically.
**************************
There are several ways we see waists added to designs.

Some designs have a gentle waist, as with many of the older peanut shape Lira da Braccio instruments.
But many other historical designs show sharply cut in waist, which in many cases also create corners.

As
with other aspects of design, the waist curves and resulting corners
start from the simplest of materials, then evolving to greater
complexity and eventual refinement.
A basic circled arc can be curled in tighter at the ends by using additional smaller radii circle arcs. This sort of structure can be refined or extended further as desired.
**********************
We've seen most of the basic structures now.
Many traditional instrument body shapes are formed from these same geometry structures.
Without resolving all the associated complexities, here are some historical examples with their basic design structures shown:
A 1620c English Cittern with a pear type body and a simple circle arc lower body shape:

A 1620s Bass Lute form Venice. Here we see a pear type body with overlapping circles and a joining arc giving the lower body shape:

Nest, we have two peanut type bodies.
The first is a vielle by Giovanni Maria of Brescia, working in Venice around 1533c:

And then a 1680 Stradivari guitar:

With the addition of intruding C shape curves at the waist, we get the further shapes of the violin family and the various cornered types of Lira da Braccio.
The various shapes of the viol family are also closely related, with a slightly different relation to the overlapping circles that are the basis of these designs also.

*******************
By observing and analyzing historical examples, we can witness an evolving usage of circle arc and line geometry giving the old instrument outlines. We can see and replicate the origination of these designs.
But, is this the full story? Did they always work a design from scratch, fully working their outlines with dividers and straight edge to get pure geometric results?

Well, no.
We see some historical examples where all or parts of the design are roughly executed freehand.
Some old instruments are very far removed from the disciplines of compass and rule geometry or proportions fairly walked out with dividers. Still, these are more the exceptions, and appear to at least be imitating designs of arc and line geometry.
Clearly,
some of the ungoverned making was simply outside the core traditions.
In other cases, there is the appearance that something starts in one
community, with clean good geometry, then gets imitated without the
geometry knowledge by makers in other communities.
Regardless, the freehand examples generally appear to be imitative of the outline shapes we see cleanly and geometrically worked in other examples. The ideas of historical instrument making appear to be ideas drawn from the simple proportions and geometry available from dividers and straight edge.
In later posts, we will explore further into the interactions of design, work processes, and the resulting final instruments.
*****************************
To close, let’s look at the geometry structure of violin like instruments. And, for convenience, we can put names to these structures.
‘Violin type’ outlines are peanut shaped outlines with corners added, essentially.
We can witness the origin of this type of shape as starting from the ‘peanut shape’ of some of the older Lira da Braccio shapes. The gentle ‘joining arcs’ of the peanut shape’s waist are replaced by C shape center curves that cut in at the waist. Corners are added.
We can see partial stages of this evolution of shape in various Lira da Braccio examples from history.

For convenience, we can discuss the upper, mid, and lower areas of the instruments. We can refer to these areas, or the sides and outline curves of these areas as ‘bouts’. So we have upper, lower, and center ‘bouts’, each with distinct geometry. We also have corners which in some sense are their own separate constructions on the outline.
Let us first consider the actual geometry constructions of these shapes. The upper and lower bouts are based on the same principle constructions, but with some variations of proportions and detail.
These outer bout constructions are all based on overlapping circles, but with different traditions of proportions for different purposes.
What evolved was a preference to make the upper bout shape rounder, by making the centers of the overlapping circles fairly close together. But, for the lower bouts, the evolution was toward a squatter shape, by spacing the centers further apart.
 All these patterns of equal sized overlapping circles were
known as ‘vesici’.
All these patterns of equal sized overlapping circles were
known as ‘vesici’.
To the ancient geometricians, this shape looked like a fish bladder, hence a vesica. One particular pattern of overlapping circles was given special attention. When the radii of the circles also equaled the distance between the two centers, then the circles were called ‘twins’, or ‘vesica piscis’.
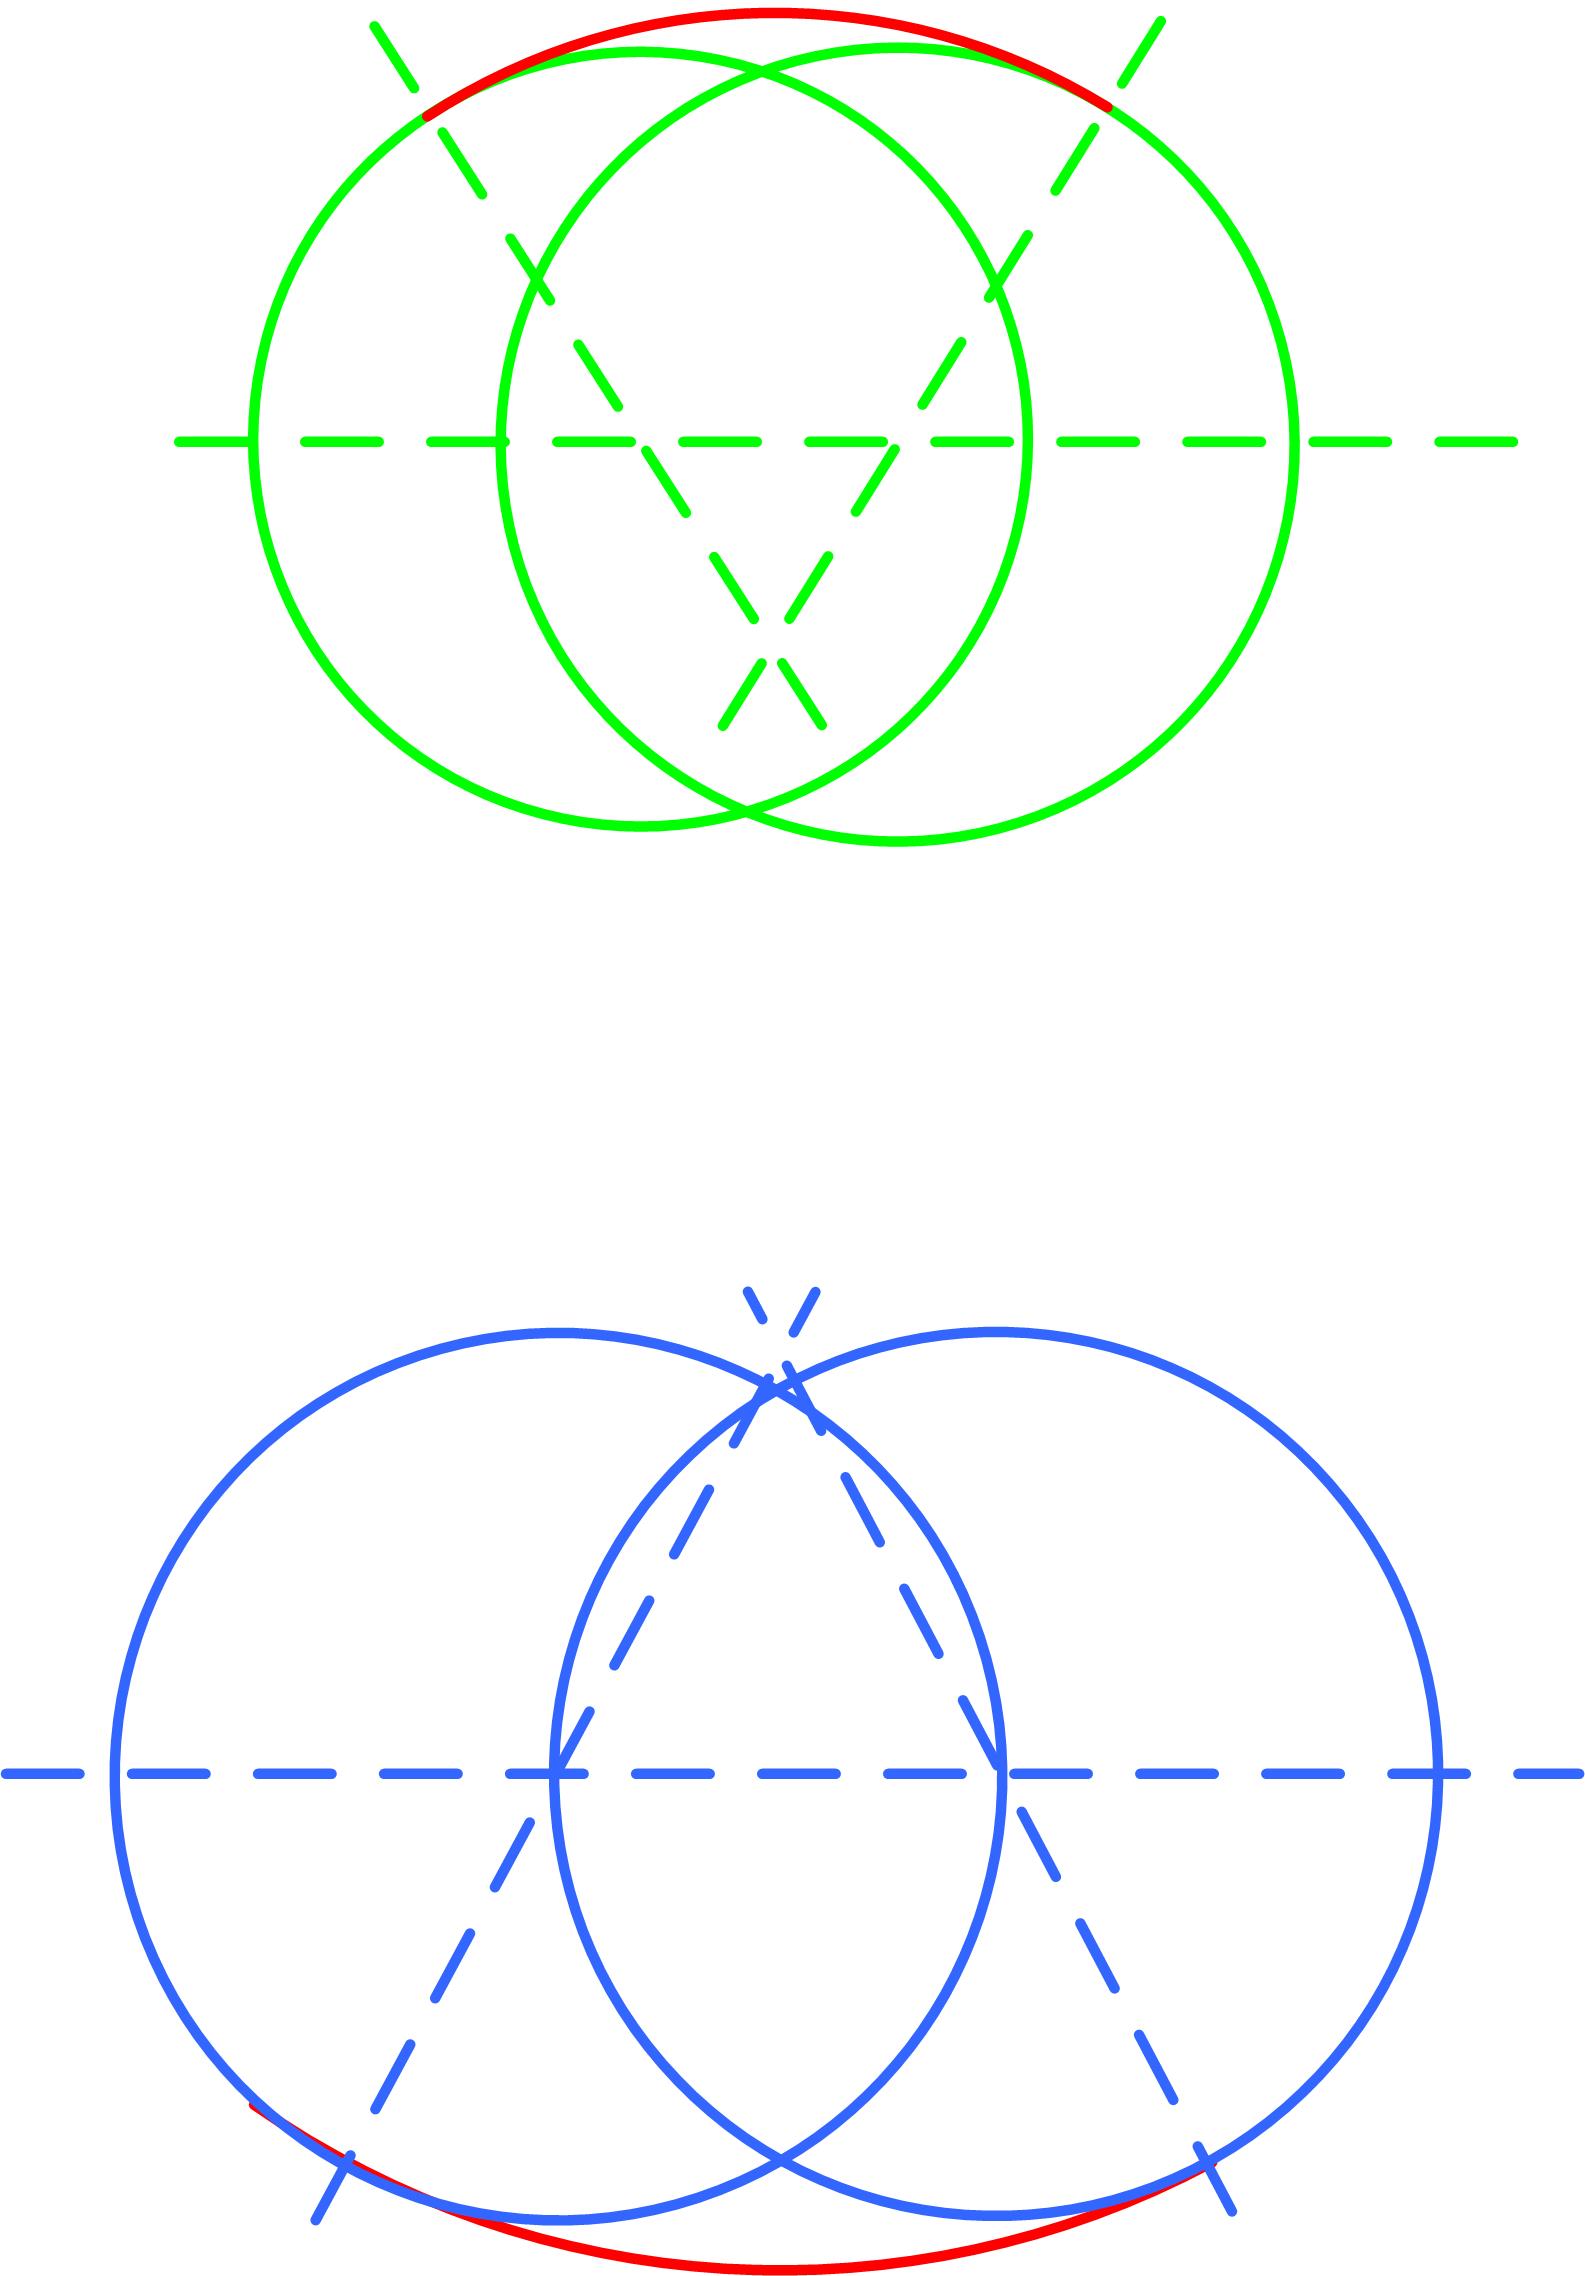
To construct a ‘violin type’ design, we base both the upper and lower bout shapes on vesici. Usually, we also smooth over the ‘dimple’ from the vesici with ‘long joining arcs’.
In
this illustration, the lower bout is based on 'twins' or 'vesica
piscis', because the distance between the circle centers equals the
radius of the circles.
In
contrast, the upper bout is still based on a vesica, but it isn't a
'vesica piscis', or 'twins', because the distance between the centers
doesn't equal the radius. It's less in this case.
This proportion of the distance between centers and the radius in a
vesica is one of the important maker choices in instrument design. The
traditions expect certain ranges for this choice for certain types of
instruments.


We also need ‘riser arcs’ to create curves from the outer
bouts toward the center area. (Just as in Arnaut's pear shape design.)
After this, corners are located and shaped by smaller ‘corner circle’ arcs. A slight gap between these allows creation of blunted corner ends that are more durable than a sharp corner would be.

We will explore these details more in later posts. But as a result, little joining segments are often needed between the risers and the corner circles, and between the corner circles and the main center bout circles. These joining segments might at times be freehand, but they are more properly and traditionally resolved as arcs related to the other curves, or with bits of straight line. The elongated riser sections of Stradivari’s 1717 pochette offers an interesting example of such connecting elements. We see many variations in these connecting components and their sizing, but all within the one primary recipe for violin type shapes.
The choices in our illustrated example here followed an English gamba example from 1580c:

********************
This same general geometry structure is repeated for a vast range of violin type instrument designs. Variations are mostly a matter of different choices of sizing and proportions using the same geometry structure. The traditions then are very much about preferences in these choices.
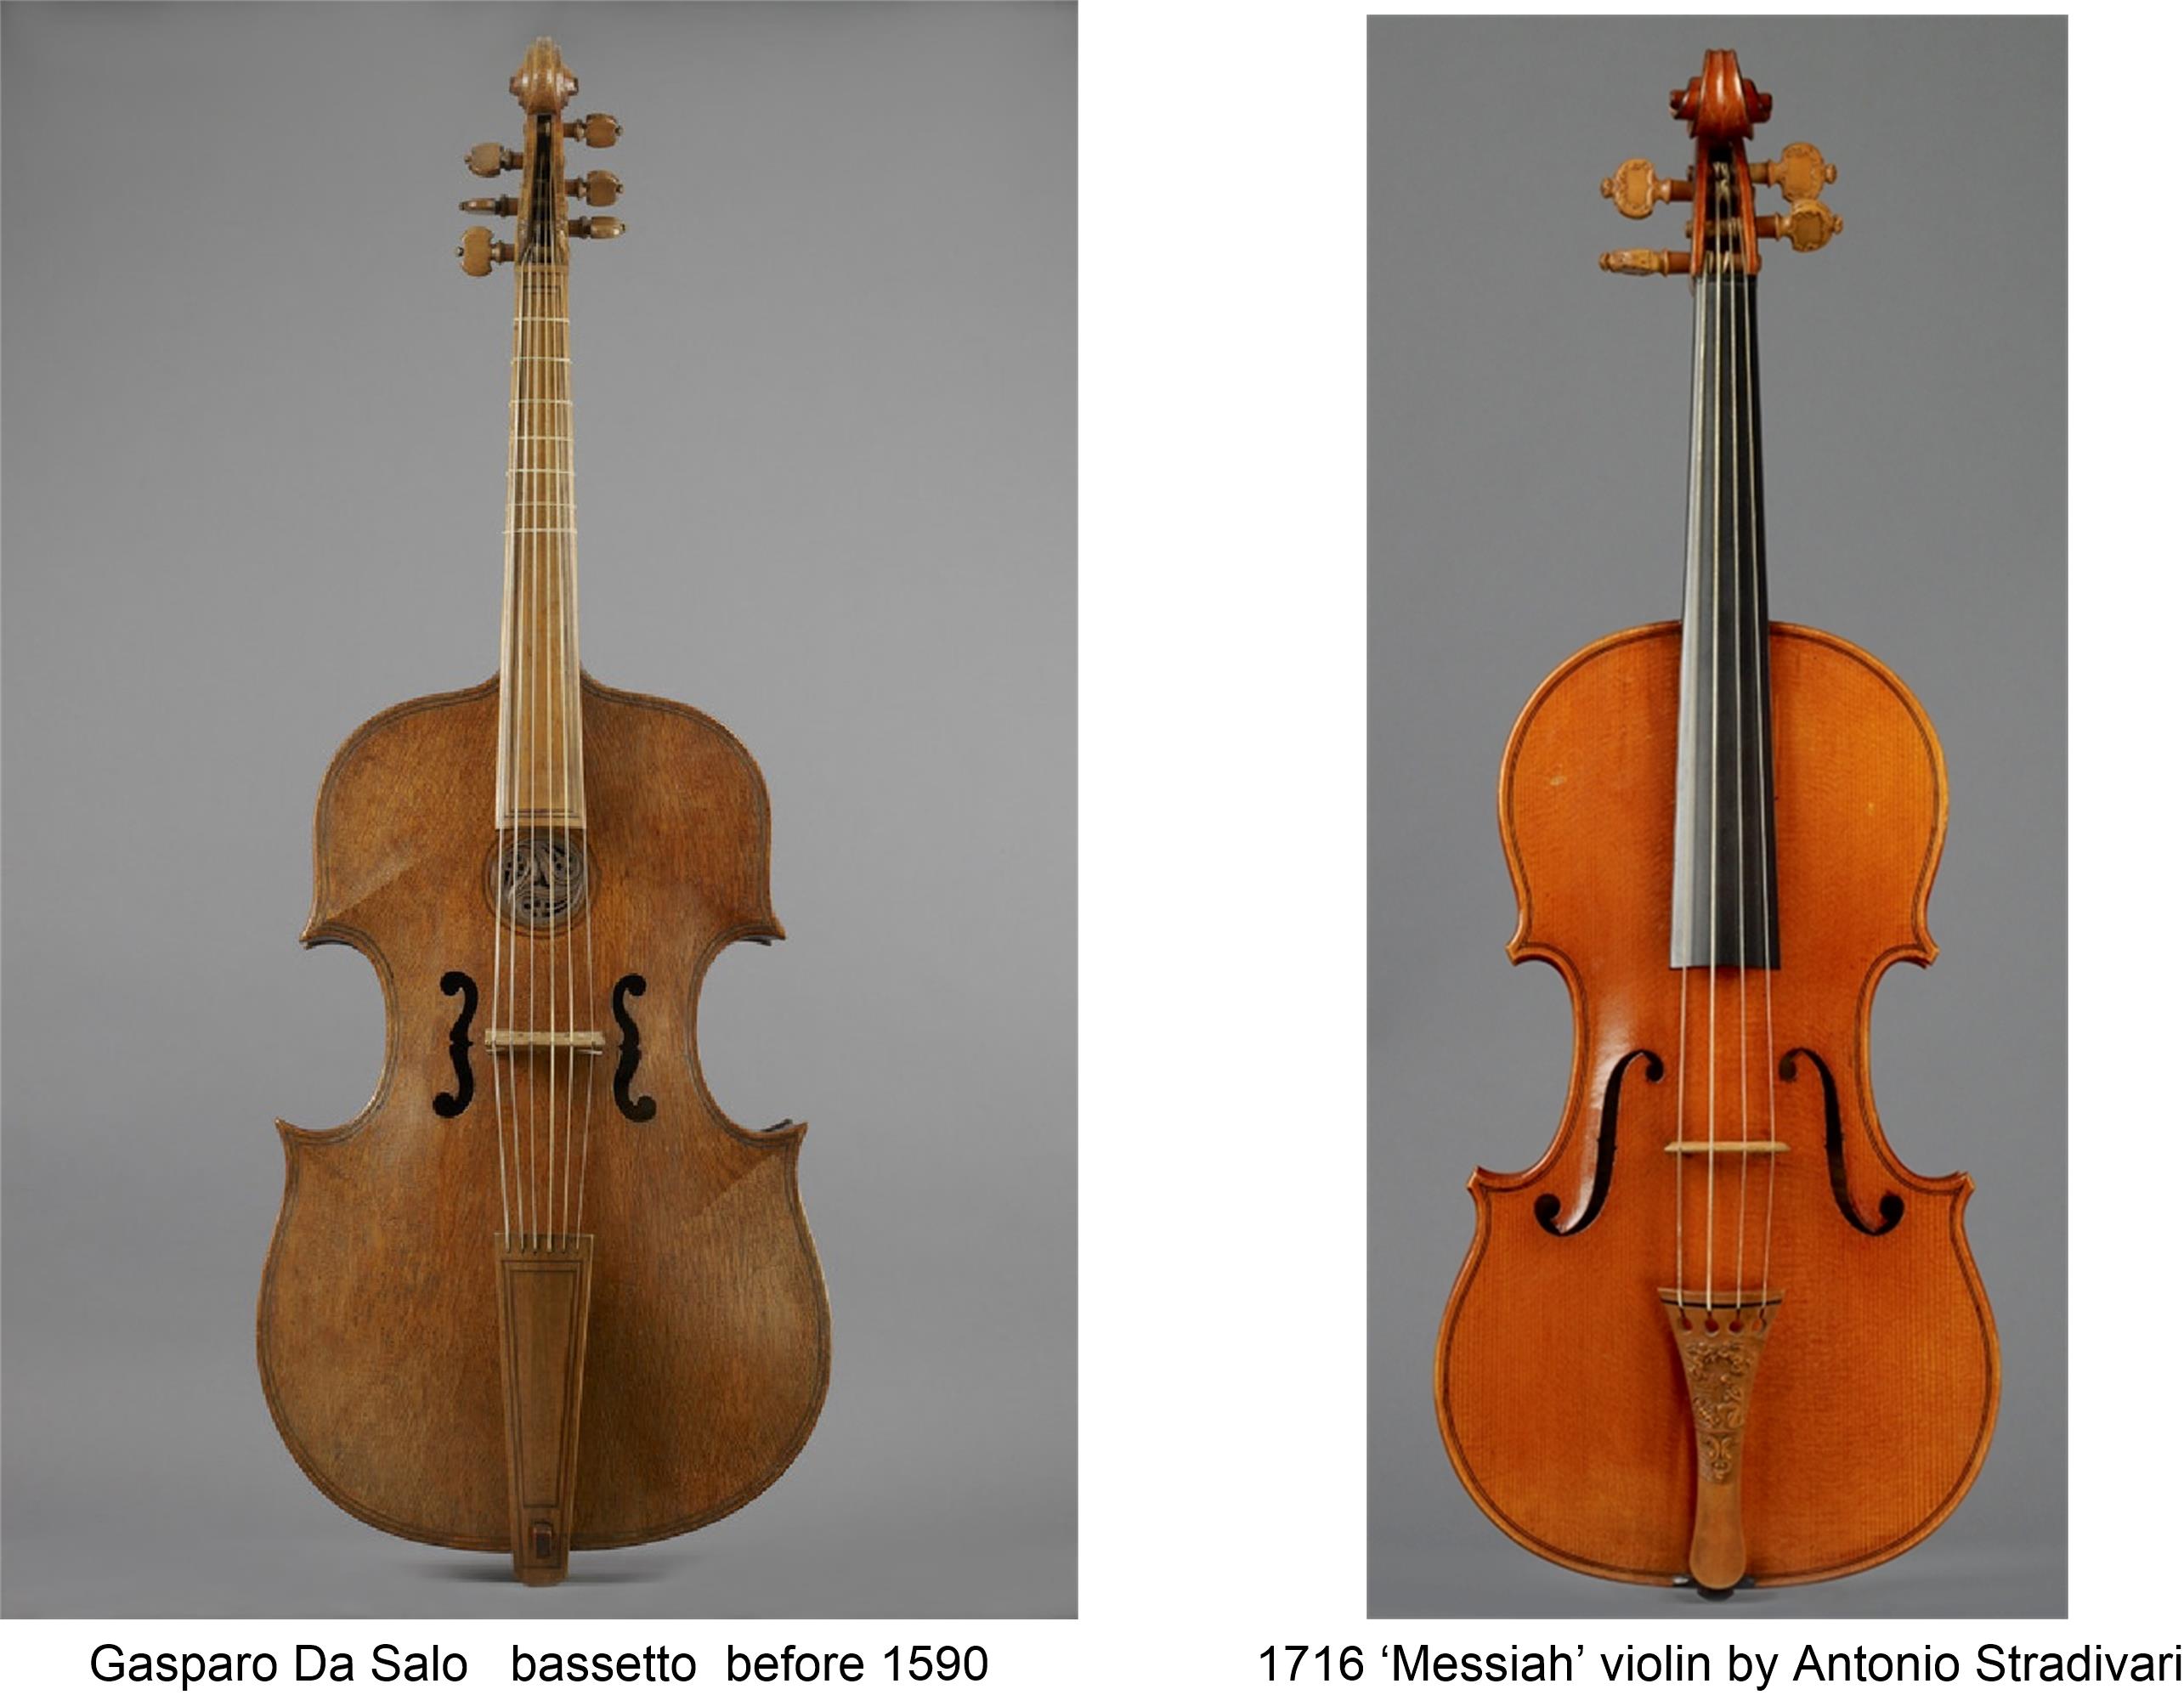
The old making sticks to common shared recipes of geometry, then evolving and refining their prefers in applying these recipes over generations of making and countless instruments. Just one basic geometry design structure is flexible enough give us both this unusual bass from Gasparo Da Salo in Brescia, and to give us the famous Golden Period instruments of Stradivari.