Cremona Revival Table of Contents Page //
Historical Making and Preliminary Topics
1) --- Measurements & Proportions
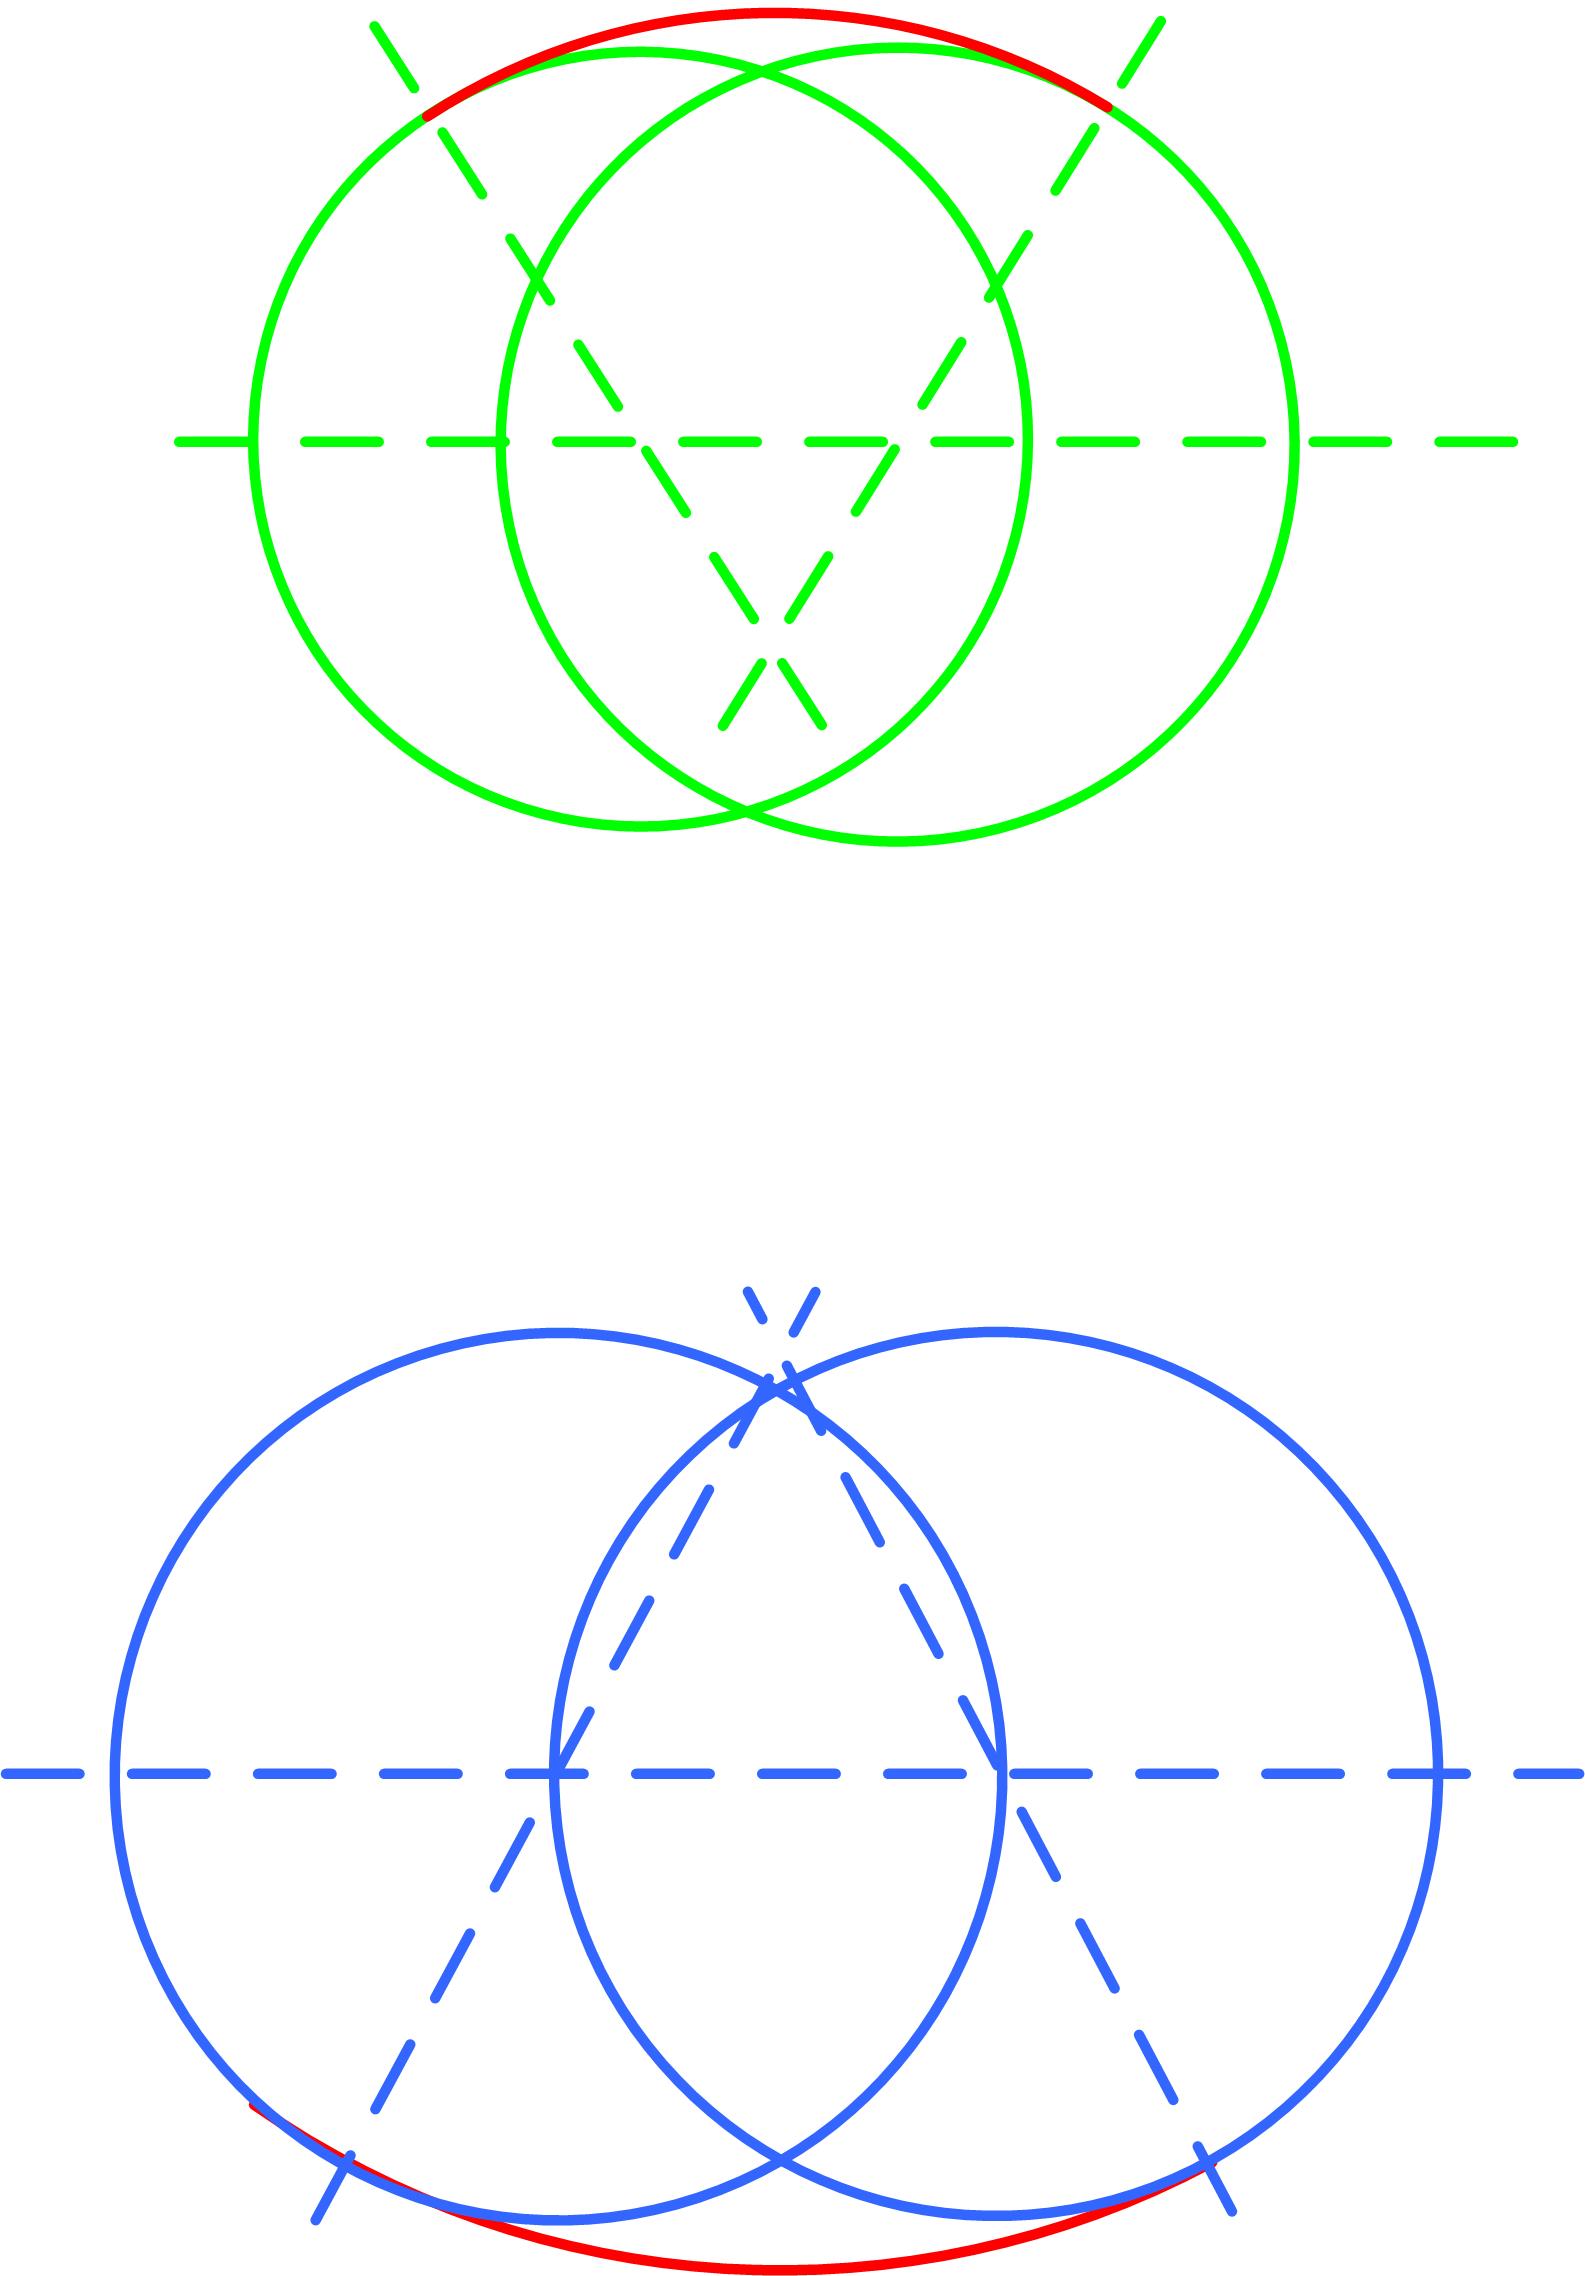
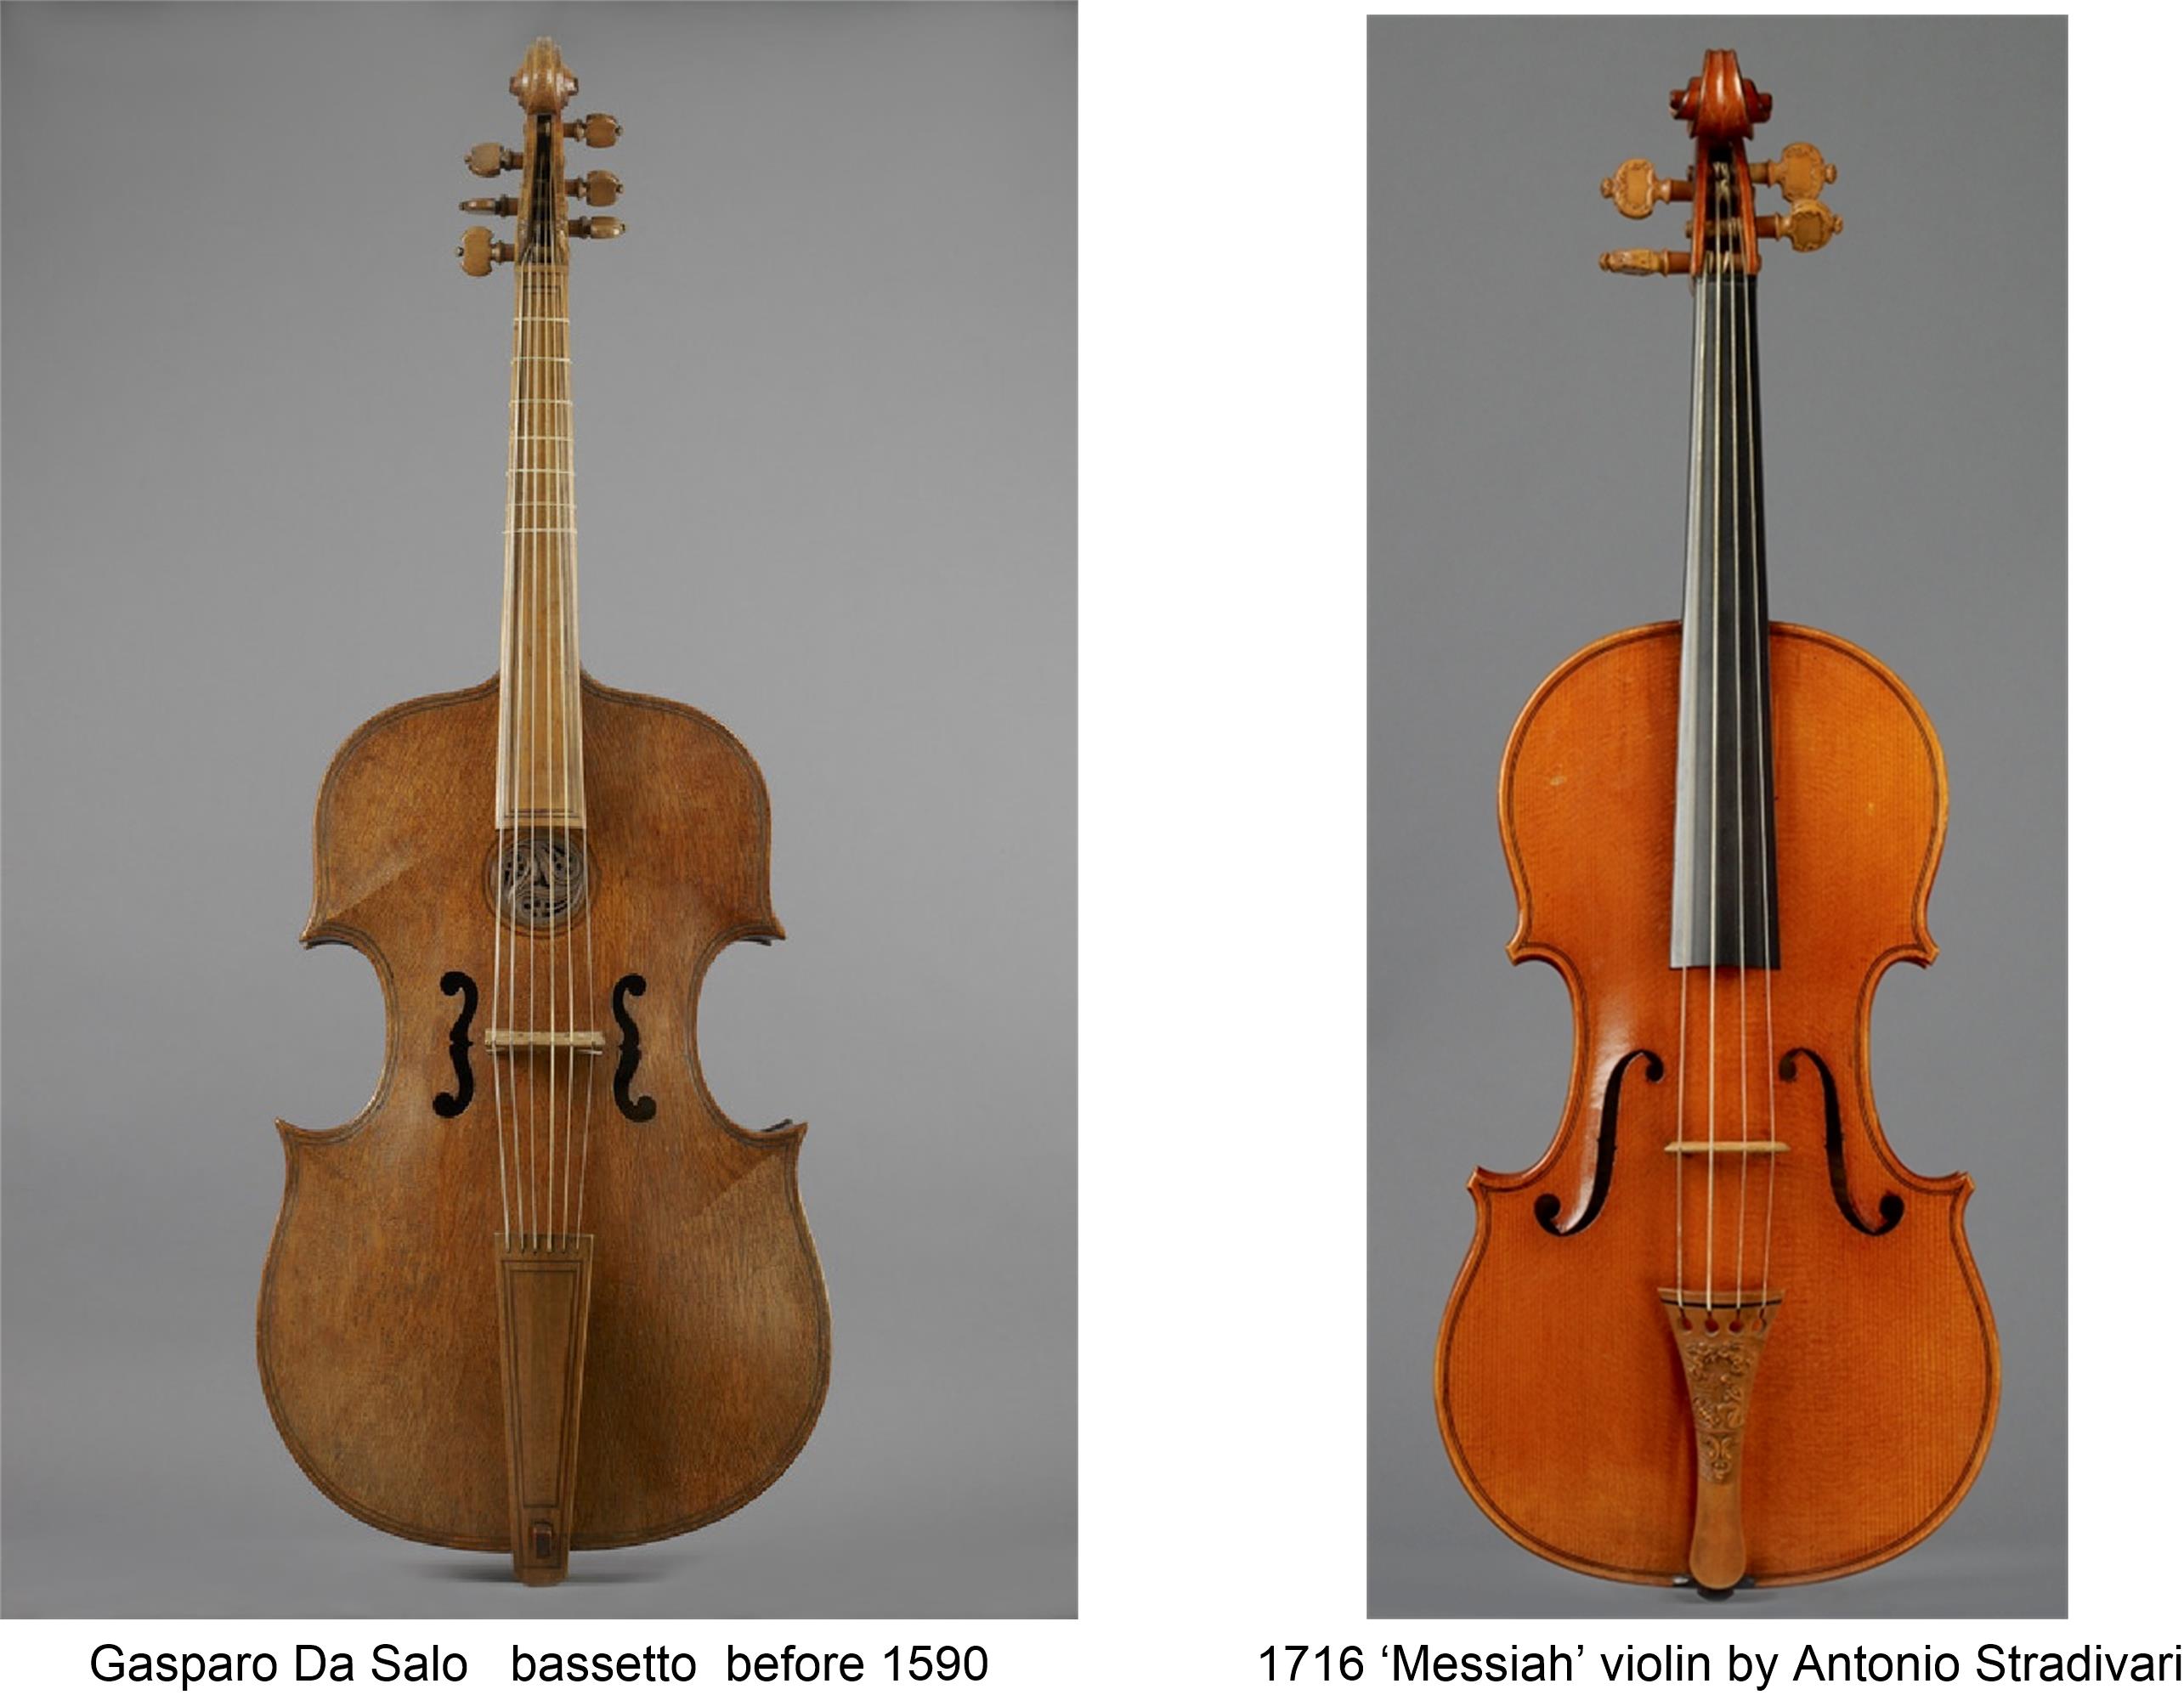
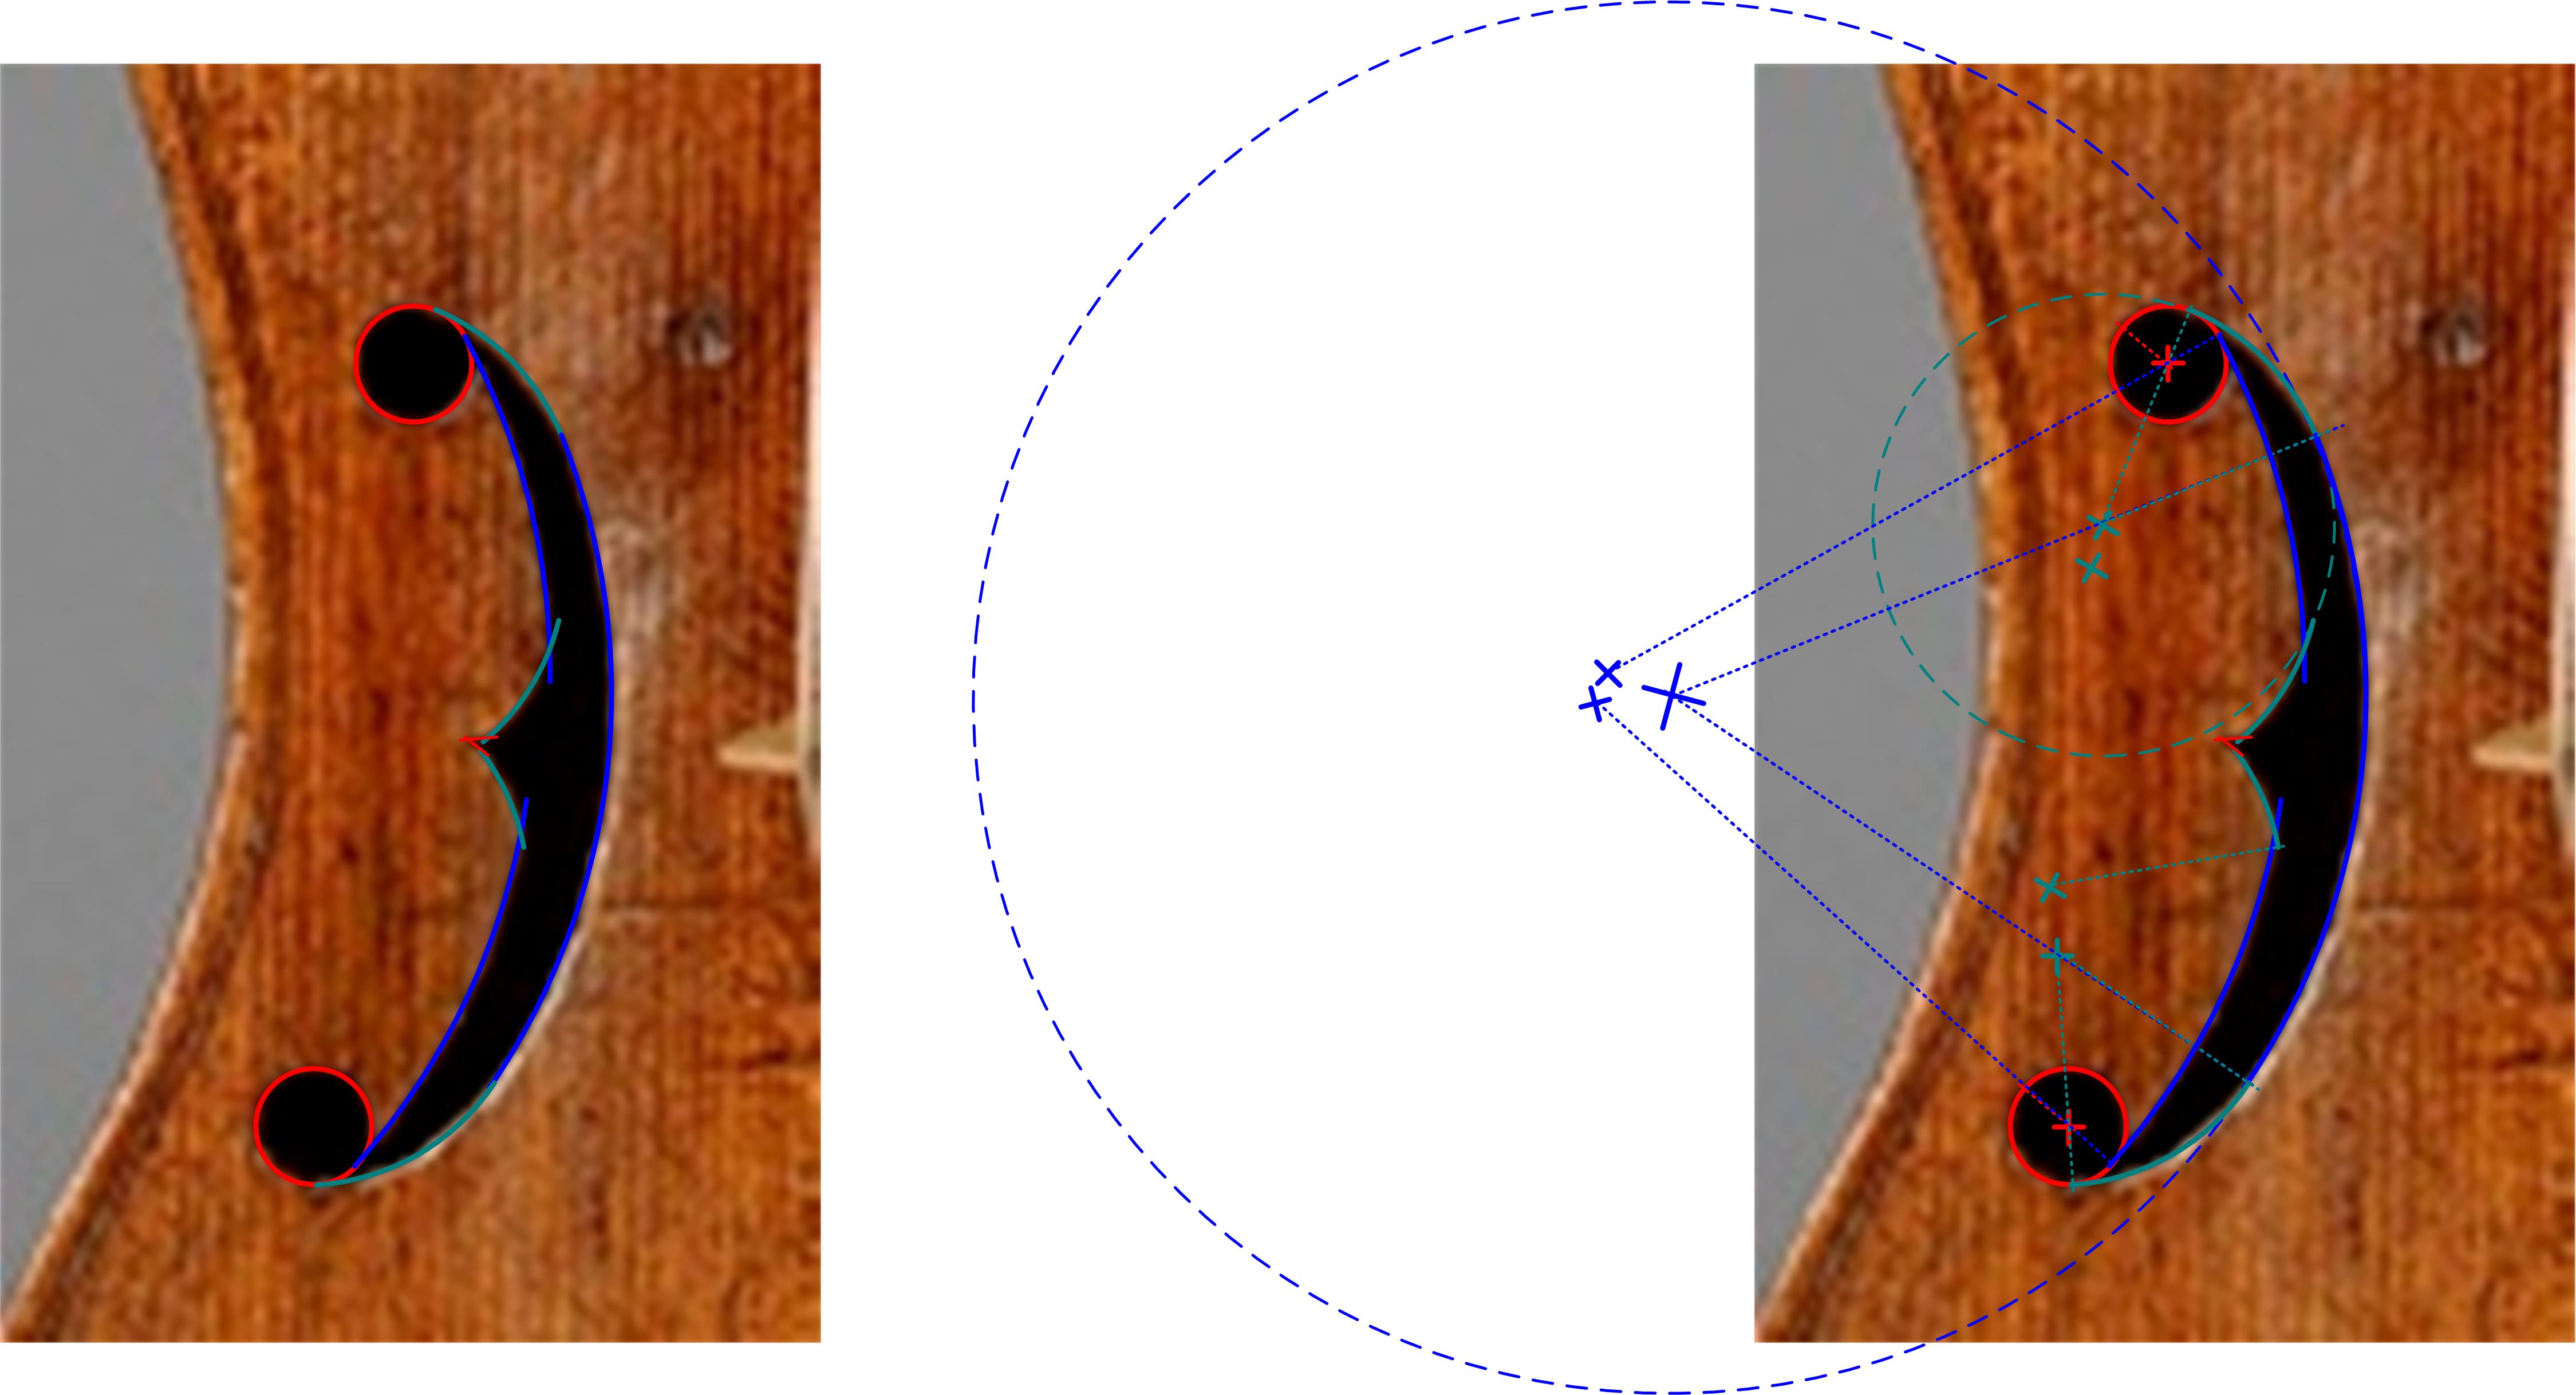
2) --- Instrument Shapes: Origins and Evolving Geometry
3) --- Arts & Materia
4) --- Making Traditions
--- Arts & Materia
Our focus is the Northern Italian culture that gave us the violin family. But, we will also look more broadly at historical European art methods and materials.

So, how does the old instrument making fit into the broader scheme of art history and the slow development of its methods over time?
To greatly simplify, the arts show several large scale shifts over the centuries.
One very big shift is from the medieval methods of painting with colors in egg yolk, or similar ‘tempera’ painting methods, to the later methods of ‘oil painting’. The great historical instrument making originates during this transition. The instrument making benefits both from the older principles of ‘tempera’, and from the use of linseed and other drying oils.
A second very large shift was from materials prepared in the workshop to commercially prepared materials. This is perhaps a later shift, and one that helped sweep away the older instrument making ways.
Also, we will look at how the older methods built up effects in layers. The idea of a ‘one coat’ or ‘one pot’ approach belongs not to the old ways but to the later commercialization of art materials into a modern industry.

****************
The materials of the older arts were close to nature. And, the methods of the diverse arts were
less separated than we might expect today.
For example, the tanner, the dye, the painter, the builder, and the gilder all made use of a ‘lime pit’ and its products. Such lime pits were once common, serving many purposes.

As with other materials of the old arts, the products of a lime pit were close to nature, exploited for their natural properties, and used since ancient times.
Not to say that significant work and knowledge weren’t needed to bring forward the usefulness of such materials. Limestone was quarried and crushed and baked in a furnace or firing pit to create ‘quicklime’ --‘quick’ as in ‘lively’. This quicklime was then ‘slacked’ with water. This slacking of quicklime releases a great deal of heat energy and can be violent and dangerous if not handled carefully. The basic method is to pour the quicklime into a pool of standing water, but in small enough quantities to be safely managed. The slacked lime settles to the bottom as lime putty. Over weeks or months, the lime putty is periodically raked and stirred up to make sure all of it is thoroughly slacked, with no little pockets of quicklime hiding in the putty. The water above the putty becomes alkaline. Disturb the putty below, and the water goes cloudy with lime, giving us ‘lime milk’. Where the lime water and oxygen interact, calcite crystal will form.
From the most ancient times, artisans and craftsman understood the special nature of limestone. Natural lime is a stone that can be broken down to make a putty that can be shaped, and that will then harden again into a sort of refined stone. Gypsum is a different material and chemistry, but it offers a similar cycle and usefulness. People learned a great many uses for lime and its products. The lime water and milk can for example be used to clean and tan leathers. Limewater is a natural alkali, giving it many uses. Another even stronger alkali is had by mixing ashes from certain kinds of wood fire with water, making potash or lye.
Even millennia before the time of chemists or alchemists, people observed nature and learned to make use of materials, exploiting their special natures. Many of these things, like the uses of lime, are really quite sophisticated.
***********
Even before humans were fully human, artisans have known to make sophisticated use of special natural materials.

In cave paintings, we see works using colored earths, white chalks, and blacks from soot and coal. Remarkably, these materials have persisted as important useful colorants in the painter’s pallet ever since.
When Pliny the Elder in his Histories and Vitruvius in his Books of Architecture give lists of colorant recipes from the practices of Greece and Rome, their recipes include the same colored earths, chalk whites, and blacks from the cave paintings. The long development of the historical arts was a continuation and expansion on truly ancient core knowledge.
To help us learn the ways of the old arts, a scattering of early European texts survive, intended to teach aspiring artisans the best and most important of these methods and materials.

We have an increasing number of art texts available as time goes forward. However, most of these are more lists of recipes rather than full guides.
From c1520, a text of ‘Diverse Secrets’ from the St. Marco library in Venice merits attention from instrument makers. This ‘Marciana Manuscript’ gives many recipes, including oil varnishes for instruments. This gives perhaps our most direct window on the ideas and state of varnish making in the region and time that gave us the violin family.
Around 1680, we get our most detailed descriptions of general woodworking tools and methods from Joseph Moxon in England, in his various publications of ‘Mechanical Exercises’..

Besides texts, we can learn from iconography, and from the
actual surviving works of the artisans.
With some materials and processes, we have multiple consistent accounts from different authors, regions, and times. With other aspects of the arts, we might have only one surviving account. Then too, some art processes we can observe used in surviving art works, yet we have no written accounts at all. Sometimes, we can observe a process used in multiple disciplines, but perhaps only one craft will have a written account.
Traditionally, this kind of knowledge was passed along within a craft, to some extent as a trade secret. Coming out of medieval times, there was a system of guilds, masters, and apprentices. That is also why so many of the texts have titles like ‘diverse secrets’.***********
Let’s take Cennini’s lead into these old art methods.
After some first words about his own training and heritage back to Giotto, and about the value of a lofty enthusiasm for the profession, and the importance of learning from a master, Cennini then states that drawing and painting are the basis of the profession. Okay.
Then he begins. Not to teach drawing, but to teach the preparation of drawing surfaces.
Take a little panel of boxwood 9 oncia square in each direction. Wash clean with water. Rub smooth with the cuttlebone that jewelers use for casting. Prepare a paper pouch filled with fine ground calcined bone. When ready to draw, stir up the bone with saliva and spread all over the board with your fingers. Tap the back of the board with the finger tip of your hand until you see all is dry. You will get an even coat of bone all over the board. Only later does he then talk about drawing on this surface with a silver stylus.
From our modern view, most of this requires explanation. From his viewpoint, he does explain some of it. He teaches how to choose the right chicken bones, and then how to cook them until ‘whiter than ashes’. And, he explains details about grinding them well, the best kind of grindstone being porphyry.

Cennini continues to teach how to produce a perfectly smoothed and evenly ‘toothed’ surface for dozens of circumstances. And, layers and grounds are always the way he builds up to a smooth surface for the art itself.

Ultimately, a great deal
of his book is about materials and their ‘tempering’, the subject of mixing
materials for various purposes. Knowledgeable
mixing gives the difference between a thick gesso prepared to fill
cracks in a carving versus a fine gesso sottile for delicate purpose,
like adding some subtle three dimensional elegance under a
calligrapher's vibrant colors. Small differences in preparations and
usage of the basically the same materials can yield hugely different
results. In the old arts, such differences were navigated not by the
modern of approach of carefully measuring and controlling recipes
precisely, but by the old ways of a knowing artisan's hand tempering
mixtures by touch and eye.
Cennini does advise the novice to continue drawing and to learn variously by copying masters, drawing from life, drawing the hand, and developing a daily habit of drawing. But most of the book is about preparing and tempering materials from scratch. He teaches the tempering of materials for various purposes, and the various layers that build up various kinds of art work.
****************

Even his first discussion of the calcined bone and saliva introduces materials. Here, the calcined bone is a kind of ‘white ground’, and the saliva is being used as a ‘binder’. In the course of his book, he introduces many different kinds of grounds, and different kinds of binders.
The idea of a ‘white ground’ is simple, most anything white and grindable. Likewise, a binder is simply something that can be mixed into grounds that will then dry and hold in place. Binders tend be sticky substances, so overlapping with the idea of adhesives. Honey for example can both bind colors, and be used as adhesive in gilding gold leaf.
Binders are further distinguished by the solvents that thin them. Proteins, starches, gums, and sugars for example can be thinned with water, as can egg yolk. Certain oil things will dry and maker good binders. But, generally these can not be thinned by water. Other oils, or certain spirits are need to thin most of the oil binders.
Colorants primarily divide into pigments and stains. Pigments are colorants that are grindable. These can then be tempered into paints by mixing with a binder.

We can stain and dye clothes, leathers, wood, and most anything. But for painting, we need grindable colors. To use stain colors in painting, we first dissolve the color into a solvent or binder, we then use that to stain something grindable like chalk or clay. Good colors can also be made by staining a solution of alum, and then precipitating out the colored alum.
The old lore of colorants and general materia is vast.
****************
So far, we’ve introduced many of the component elements of the old arts. Now, lets walk through the usage of these things in a few basic scenarios.
>> To Make a Tracing Paper <<
Take the parchment to a parchment worker and have them scrape it thin until barely holding together, but scraped evenly. Then take linseed oil and wipe it all over and let dry.
This illustrates the technique of making things transparent by penetration and wetting with an oil material, like linseed oil. We see variations of this idea discussed in various art and craft texts. We also see a flip side version. Cennini for example advises care with the oil varnishes, as they will ‘rule’ anything, that is they can sometimes penetrate into a work an make it transparent, instead of providing a protective coating. When transparency and penetration are desired, we are often enough advised to apply the oil hot.
>> To Prepare a Green Tint Paper for Drawing <<

This illustrates a few generally important techniques. One, we again see the ground calcine bone added to provide ‘tooth’ for drawing with a silver or lead stylus. Also, we are taught here how to make a thin watery glue to use as ‘size’. ‘Sizing’ materials was a ubiquitous operation in every craft, including woodworking, at least into the beginning of the 20th century. Now it’s largely forgotten outside of certain industries like paper production. Sizing is a way to pull together, firm up, and even modify the surface of a material. Some sort of drying binder is applied in a thinned form and allowed to dry. A sizing should never be so thick as to glaze the surface of a material. We are also shown here the method of using pigments as a stain in sizing. Thin dispersal and fine grinding are important here so the results are not splotchy or gritty, but rather even and as much like a dissolved stain as possible.
In
other texts and parts of Cennini, we also learn the old arts had a
technique of levigation to isolate the finest possible particles. Such
methods can even produce what we today call 'nano particles', even
though they would instead call them something like 'impalpably fine'.
It is not difficult for example to use levigation to isolate lime putty
particles so fine that they dry out to a crust that looks violet in
color. This is because the particles are the size of red light
wavelengths, interfering with the red light and giving a violet cast.
>> General Preparation of a Gesso Surface for Painting <<
Here I will not paraphrase direct passages from Cennini, but instead will summarize ideas that are spread through many pages and chapters of his book.

Next is secure a good under surface. With walls, this means a heavy rough coat of lime mortar (limeputty and sand). Anything greasy or waxy must be well cleaned off, or physically scraped off or covered over. Cracks in wood must be filled and smoothed. With altar pieces or panels, any questionable surface can be laid over with canvas.
Once satisfied of a clean good undersurface, we size this all over. This is repeated several times, allowing to dry well between each sizing.
The sizing is followed by a gesso grosso, which can be
either a lime putty or a gypsum plaster.
This is applied smoothly all over.
Once dry, this gesso affords a final opportunity to crisp up and shape
the piece. Scrapers are used to smooth
and shape as desired. Other later authors talk of using pumice stone for this smoothing and shaping of the coarse gesso.
The final coats are of fine gesso sottile. This is the same
sort of putty, but completely slaked in water.
Then dried and shave off as a fine powder. Then used in sizing to apply. This can be washed and rubbed into the gesso
grosso to create a fine surface, or applied liberally by brush. Each coat of sottile is allowed to mostly dry
before the next, but not totally. All
this gesso sottile work is done in one day, and into the night if
needed, so a slight dampness remaining between coats can help unify
these layers.
All the earlier steps are simply about securing and protecting the final sottile coating. Indeed, Cennini notes that small or fine pieces can simply be given the sottile gesso directly.
>> How to Scrape Down the Flat Gesso Sottile <<
Let the sottile dry for two days and nights, or longer. Then, ball up some ground charcoal in a cloth and pounce all over the sottile. Take some hen or goose feathers and spread the black evenly. This black will show your progress as you scrape the sottile smooth.
The art works were then built above such a ground of fine white mineral. The art works themselves were also built in layers of colors, with awareness of the interaction of layers and light. Varnish was then a last layer to protect painting work.

The biggest difference is that instrument makers tended to show off the wood directly, using largely transparent finishing methods, with painting as a secondary and optional decorative resource.

We can expect they used metal scrapers in the late stages of smoothing instruments. And, we actually have a set of scrapers left over in the old Cremona workshop artifacts, presumably scrapers used by Antonio Stradivari himself. We can also assume that other common abrasives of the artisan would have been used whenever convenient to the work; namely pumice stone, horsetail reed, dogfish skin, cuttlebone, chalk, rottenstone, red rouge, et al.
While today, the idea of taking varnish and applying it directly or nearly directly to wood is common place, it might well not be such a natural idea for a medieval or renaissance artisan. Rather than entirely skipping the use of a gesso or grounds layer, it would probably be more natural and consistent with general practices of the old arts for an instrument maker to just simplify the grounds procedure to a gesso sottile, and then render the gesso transparent by penetrating it with oil or oil varnish.
*************
Mostly, we’ve discussed the foundations of classical painting and artisan methods, the protein binder ‘tempera’ methods before oil painting became more wide spread. But, the rise of oil painting methods is one of the things that developed coming into the renaissance.


A very interesting effect of these glaze or lake type layers is that the color we see can depend on the angle of viewing, and on the intensity of light. In effect, if we view at an angle, or in low light, we will mostly see the color of the glaze itself. But, if we view such a glaze either in very strong light, or at a straight on angle, we will look through the glaze and see whatever color is underneath!

Not insignificantly, the famous North Italian instrument and violin making flourished in this transition between old art materials and the new oil materials and methods. The older methods were still alive and foundational to the arts and crafts. But, the newer oil methods and materials were increasing available and widespread. Some instrument makers made excellent use of these opportunities.
************
We can also turn to modern science in our efforts to observe old instrument making and its materials. However, scientific efforts have often proofed less clarifying that we might hope.
Part of this is because chemical components and art materia are different things. In art lore, it’s understood for example that dried linseed oil tends to yellow over time. Artisans will substitute other oils like poppy seed when they don’t want that yellowing. But, decades or centuries after application, the chemicals of these different materia look very similar when analyzed. Likewise, the many different natural resins that distinguish one artisan varnish recipe from another, don’t look so clearly different in later chemical analysis. Likewise, does a trace of mercury represent Vermillion pigment, and does a trace of arsenic represent orpiment pigment? Or might these elements represent different things.
Beyond the difficulties in distinguishing different chemically similar materia, matters are complicated by the layering techniques of the old arts. Is a chemical analysis just mashing all the layers together? That can greatly confuse interpretations of results.
Were proteins used in old instrument finishes? Were pigment particles used? Were particles of mineral grounds used? With all this basic questions, some studies have concluded yes, some no, and some maybe. Not so helpful.
It is clear however, that with each if these questions, at least some studies have confirmed these common art materials.
Only in very recent
years have some teams developed non-destructive methods that can resolve
materials and spatial location on a fine enough micro scale to enable layer
analysis of materials and layers of material usage. Hopefully more of this sort of research will
bring clarity to this area of study.

Scientific studies can also illuminate aspects of classical instrument maker wood use. Dendro chronology studies have given a number of interesting results. For one, people have demonstrated use of wood from the same log by makers in separated locations in Italy, suggesting that at least at times some makers bought wood from traveling specialist vendors. We also have cases were some rings visible on an instrument are dated as little as 7 years before the instrument was made, indicating that makers did not always significantly age wood before use. Lastly, studies of the materials properties of the wood, density, elasticity, etc, indicate that classical Cremona violin makers did not use particularly exotic or out of the ordinary selections of wood in these basic respects. The physical proprieties of the wood they chose are generally consistent with the ranges still readily available in the same species and regions as then.
**********
It is very difficult with both instruments and paintings to dissect exactly everything done to create a particular example. Some things are easily seen, others details can be deeply mysterious. But, we can reasonable expect that what we see in the old instruments was generally created within the broader typical materials and methods of the artisans.
We can expect that iron scrapers and common abrasives were used. Sizing and stains should not surprise us. A good maker would have awareness of glazing and transparency effects. While perhaps not always used, grounds rendered transparent were likely the normal starting point. A transparent glaze with filler over the ground would not be surprising. Protective varnish as a top layer is expected. Decorative painting can be added when desired.


%20Just%20the%20violleta.jpg)